
OBJECTIVE:
In this lab I would like to install a TFTP server in OpenSuse Linux, and then try to copy files from a Cisco router toe the server.REQUIRED MATERIALS:
- 1 x Cisco Router
- 1 x Switch
- 1 x PC with OpenSuse Linux 12.3 already installed
- 2 x Ethernet cables to connect the equipment to the switch
PRE-REQUISITES:
A basic understanding of:- Ethernet networking
- The Linux Operating System
- Cisco Console and Command Line Interface
REFERENCES:
- tftp(1) - Linux Man Page
- tftp(8) - Linux Man Page
PROCEDURE:
This procedure consists of basically three parts:- Installing the TFTP Server in OpenSuse
- Configuring the TFTP Server After Installing It
- Copying Files from a Cisco Device to the TFTP Server
Installing the TFTP Server in OpenSuse
Step 1.To install a TFTP server in OpenSuse Linux, start the YaST Control Center. Click on “Software Management” in the right pane, as shown below.
 | |
| Figure 1. YaST Control Center |
Step 2.
Enter tftp in the search dialog box and click the “Search” button next to it.
Step 3.
The pane immediately to the right shows the results of the search. Mark the checkboxes next to “tftp” and “yast2-tftp-server” as shown in Figure 2. Click the “Accept” button on the bottom right of the window to start the installation process.
 |
| Figure 2. Yast Software Installation Dialog Box |
Configuring the TFTP Server After Installing It
Step 1.After the software has been installed, startup YaST again. Click on “Network Services” in the left pane. Click on “TFTP Server” in the right pane as shown in Figure 3.
 |
| Figure 3. Starting the TFTP Server Configuration Utility |
Step 2.
This will cause the “TFTP Server Configuration” dialog window to pop up as shown in Figure 4 below. Click the “Enable” radio button.
Step 3.
The dialog box entitled “Boot Image Directory” is where the files that are uploaded to and downloaded from the TFTP server are stored. Accept the default or change it by clicking the “Browse” button.
Step 4.
Mark the checkbox next to “Open Port in Firewall”. Click “OK”.
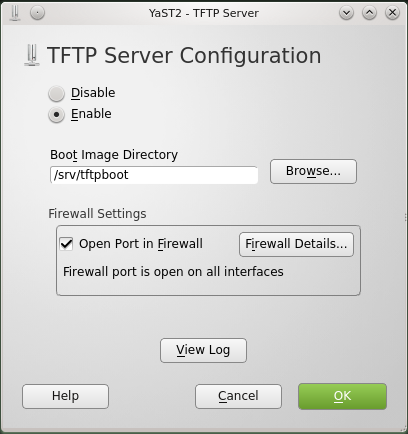 |
| Figure 4. TFTP Configuration Dialog Box |
Step 5.
Open a file and directory management program such as Dolphin. Right click on the folder “/srv/tftpboot”, or, if you selected another folder for the Boot Image Directory, right click on that.
Shown in Figure 5 below are the default permission settings for the directory.
 |
| Figure 5. Default TFTP Permissions |
Step 6.
For the TFTP server to work properly, we need to change the default settings to match those shown in the next screen shot shown below in Figure 6. Basically we need to:
- Change “Others” from “Forbidden” to “Can View & Modify Content”.
- Change group ownership from “tftp” to “users”.
 |
| Figure 6. Modified TFTP Permissions |
Step 7.
Next we need to change the configuration file. Using your favorite text editor (l like to use KWrite), open “/etc/xinetd.d/tftp”. Look for the line that shows:
- server_args = -u tftp -s /srv/tftpboot
Step 8.
In your text editor:
- Delete “-u tftp”
- Add “-c”
- If you selected a different Boot Imaging Directory above, that should be displayed in the line instead of “/srv/tftpboot”.
In order for a file to be copied to that directory, a zero sized file must be created first in that directory. What the “-c” switch does is that it allows the TFTP server to automatically create the zero sized file before the actual copy process begins so that you don’t have to create the zero sized file manually before copying the actual file. The configuration should like the one shown below:
service tftp
{
socket_type = dgram
protocol = udp
wait = yes
flags = IPv6 IPv4
user = root
server = /usr/sbin/in.tftpd
server_args = -s –c /srv/tftpboot
# per_source = 11
# cps = 100 2
disable = no
}
Copying Files from a Cisco Device to the TFTP Server
Something that you need to know when copying files from a Cisco device to the TFTP server is that when you enter the URL of the TFTP server, you do NOT need to enter the full path to the storage folder because the Linux configuration file takes care of that for you. For example, to copy the “startup-config” file to the TFTP server with an IP address of 192.168.1.10, I would enter the command:#copy startup-config tftp://192.168.1.10/startup-configNotice that I did NOT enter the command:
#copy startup-config tftp://192.168.1.10/srv/tftpboot/startup-config
Troubleshooting
1. Verify that the Cisco device and the TFTP server can ping one another.2. Verify that your firewall is not blocking TFTP traffic.
3. Open the “TFTP Server Configuration” dialog box, and click on “View Log” (Figure 4) for clues as to why things are not working.
If you see a message that says :
Unknown option: ‘-‘
Or,
Too many -s directories
That means that you need to insert a space between the switches in the configuration file or that there is some other typographical error.
If you get a message that says:
Cannot set groups for user tftp
Then you need to remove the “-u” and “tftp” from the “server_args” line of the configuration file. Verify that the line looks exactly like the one shown above.